GMS

Importing Older Projects into GMS

Do you have an older GMS project that you need to open in the current version of GMS? Maybe you want to bring an older project into a newer version of GMS so you can make use of new features that have been added to GMS. Working with older projects can sometimes be tricky. Older versions of GMS are no longer supported and will break down over time. This article will explain more about why this happens and what can be done to get your older projects into a current version of GMS.

Generally speaking, GMS rarely has problems opening projects that are only a few years old. For example, the current version of GMS is version 10.5. Projects created in versions as far back as GMS 10.0 or 10.1 are likely to open without any issues For projects that are older, for example, projects that were created more than ten years ago, some issues may occur.

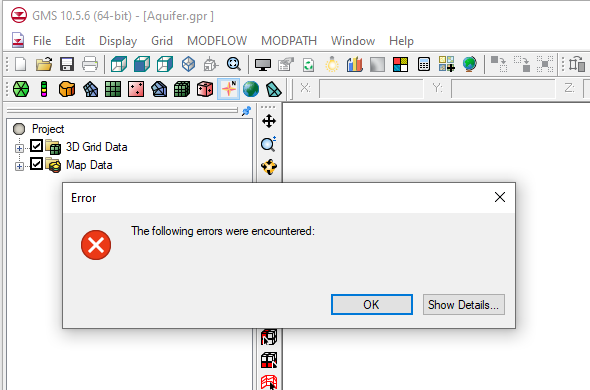
Over time, changes to the GMS interface, changes to the Windows operating system, and other factors may cause your project to not open in a current version of GMS. Also, how the data files were stored may cause the data to be unreadable.

When you have an older project that has failed to import into GMS, you can try a couple methods to get it into the current version of GMS.

Error opening an older project in GMS 10.5

The first method is to migrate the project through different GMS versions. This is done by opening the project through consecutively more recent versions of GMS. For example, if your project was originally built in GMS 8.1 and does not open in GMS 10.5, you could start by opening the project in GMS 9.0, and then saving the project if it imports correctly. After this, try opening the project in GMS 10.0 and saving the project again. Finally, see if the project opens in GMS 10.5 and save it. While doing this stepping process, review the project to make certain it remained intact. Some corrections are likely needed because of how the migration process functions.

Aquaveo’s technical support team can help you obtain older versions of the software if you have a current license.

The second method is to rebuild the project in the current version of GMS using files from the original project. For MODFLOW projects, this is done by importing the native MODFLOW files. GMS can also read the MODFLOW files that are exported by GMS. You also may need to import individual files, such as the map files or grid files. Using this method you may not get everything out of the older project, but should be able to obtain enough to create a complete, working project.

If you need additional help with importing an older project into the current version of GMS or any of our software, contact our consulting team for assistance.

Blog tags: 

Importing a Shapefile to the DRN Package

Do you have drainage data in a shapefile that you would like to import into GMS to use for the drainage package in your MODFLOW project? Shapefiles are capable of holding a variety of information, including drainage data and other data used by MODFLOW. And a lot of software are capable of converting parts of a MODFLOW project into a shapefile.

If you have a shapefile with drainage data, it can be used for the DRN package in your MODFLOW simulation. This is done by using the following workflow:

  1. Use any of the methods to open a file to import your shapefile into your GMS project.
  2. One the shapefile has been imported into the GIS module, check to see if the conductivity values for the drains were imported with the shapefile. In most cases, this will happen automatically.
  3. In your MODFLOW conceptual model, create a map coverage with the drain option turned on in the coverage setup.
  4. Back in the GIS module, use the GIS | Shape > Feature Object command to open the GIS to Feature Objects wizard.
  5. In the first step of the wizard, make certain the drain coverage is selected and the correct shapefile is selected.
  6. In the second step of the wizard, make certain the Type and Conductivity columns are set correctly.
  7. Shapfile converstion to Drain feature objects
  8. After converting the shapefile to the map coverage, review the arcs and attributes. Clean up the coverage if needed.
  9. Finally, map the coverage to your MODFLOW model.

This workflow can be used for other MODFLOW attributes that are in shapefiles and need to be added to your MODFLOW project in GMS. For example, this workflow could be used to import a shapefile for wells, rivers, or other MODFLOW features. This workflow can also be used when importing MODFLOW projects into GMS where the MODFLOW project was created using other software.

Try out using shapefiles to import drain data into GMS today!

Blog tags: 

Changes to Aquaveo Registration

Aquaveo has been updating its registration process to make using our products easier and more secure. The change affects newer versions of our products, specifically GMS 10.5, SMS 13.1, and AHGW 3.5. Going forward, it will be added to all of our products, including WMS.

The new registration uses new codes: Local and Flex codes.

  • Local password: will support virtual machines and remote desktop, but is only good for one machine and cannot be moved from one computer to another.
  • Flex password: acts like a network lock where the license is hosted on your computer and can be used over remote desktop or on a virtual machine. When you want to move the license to another computer, you simply check the license back in and check it out on another machine. There is no hardware to deal with.

By default the software is set to use the newer registration process with newer versions of the software. Local and Flex codes are not compatible with older versions of our software.

In many cases you won't notice a difference with the change to licensing. However, if you encounter an error with your registration or want to use the older licensing process, you can switch back to using the old registration.

  1. Open the newly installed software.
  2. Choose to run it in Community Edition, if the "no license found" dialog appears.
  3. Once the software is open, go to Edit | Preferences.
  4. Click on the Licensing tab.
  5. Check on the box for "Use Legacy Licensing".
  6. Click OK and restart the software.
  7. Then register the software as you have before.
Switching to legacy registration

Currently, we plan on supporting hardware locks and the legacy registration version for at least the next two years. If you want to try out the new registration system, contact our licensing team at licensing@aquaveo.com.

Blog tags: 

Plotting Conductance for the DRN Package

Are you looking for a way to contour the conductance of drainage areas in your groundwater model? If you have a large regional model containing areas with a dense drainage network (ditches, tile drainage, etc.), you can scale up this to represent a diffused drainage system. When doing this, there are not only single ditches simulated with the drain (DRN) package, but whole areas. Using GMS, you can create a contour of these drainage areas.

Contoured drain area

To create this contour, use the following workflow:

  1. Go to MODFLOW | Optional Packages | DRN to open the Drain (DRN) Package dialog.
  2. Make sure IJK is selected on the bottom in order to have the drains at their XYZ locations.
  3. Click the top left blank grey box to select all or select and drag to select all the data points.
  4. Copy the data and paste in a word processor such as Notepad++ and save the file.
  5. Back in GMS, select Open File and select the new text file. The text wizard should open up and already have delimited the file, but double check to make sure all the values are correct.
  6. Click Next then change the GMS data type to 3D Scatter points.
  7. If your file included elevations, you can make sure those are not mapped into your project by changing the dataset above to "Not Mapped".
  8. Otherwise, make sure your IJK cell values are matched up with their respective XYZ values and your conductance is set as the "Dataset".
  9. You may have to select the projection for this dataset in order for it to line up with your current project.
  10. You can then go to Display Options, select 3D scatter points on the left sidebar, and then turn on Contours if it has not already been turned on. You can check the contour options to see if the setup and coloring is to your liking.

Completing this workflow should cover all the drain points within the MODFLOW project. Try out contouring drainage areas in GMS today!

Blog tags: 

Pages