SMS

Changes to Aquaveo Registration

Aquaveo has been updating its registration process to make using our products easier and more secure. The change affects newer versions of our products, specifically GMS 10.5, SMS 13.1, and AHGW 3.5. Going forward, it will be added to all of our products, including WMS.

The new registration uses new codes: Local and Flex codes.

  • Local password: will support virtual machines and remote desktop, but is only good for one machine and cannot be moved from one computer to another.
  • Flex password: acts like a network lock where the license is hosted on your computer and can be used over remote desktop or on a virtual machine. When you want to move the license to another computer, you simply check the license back in and check it out on another machine. There is no hardware to deal with.

By default the software is set to use the newer registration process with newer versions of the software. Local and Flex codes are not compatible with older versions of our software.

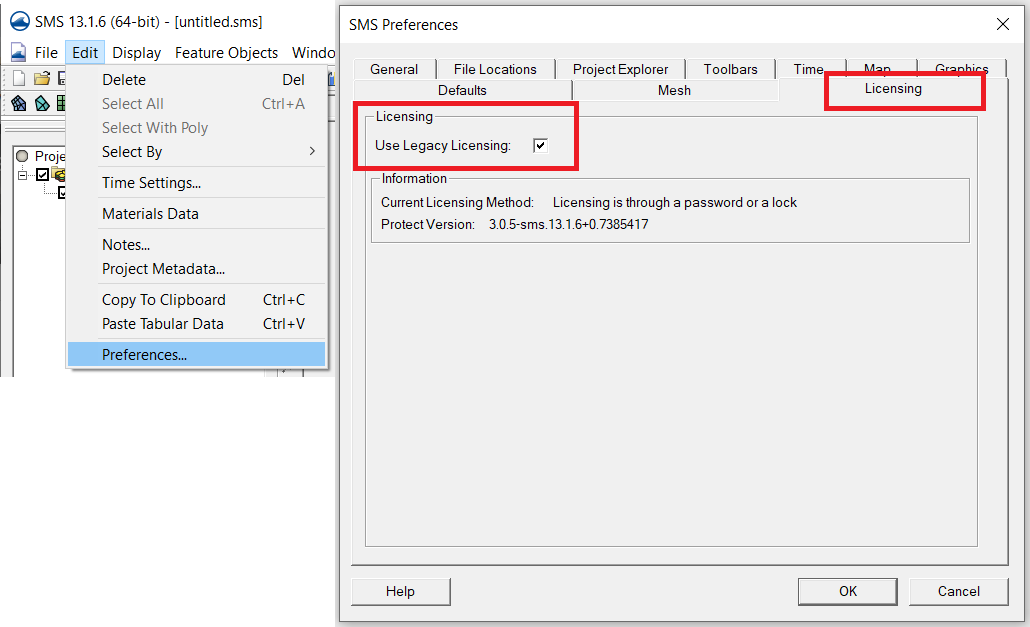
In many cases you won't notice a difference with the change to licensing. However, if you encounter an error with your registration or want to use the older licensing process, you can switch back to using the old registration.

  1. Open the newly installed software.
  2. Choose to run it in Community Edition, if the "no license found" dialog appears.
  3. Once the software is open, go to Edit | Preferences.
  4. Click on the Licensing tab.
  5. Check on the box for "Use Legacy Licensing".
  6. Click OK and restart the software.
  7. Then register the software as you have before.
Switching to legacy registration

Currently, we plan on supporting hardware locks and the legacy registration version for at least the next two years. If you want to try out the new registration system, contact our licensing team at licensing@aquaveo.com.

Blog tags: 

Using the Import Wizard to Create a Cross Section Database

Do you have a cross section database that needs to be included in your surface water project? A new feature in SMS 13.1.1 beta allows you to import a cross section database using the File Import Wizard.

A cross section database can be imported from a spreadsheet or a specially formatted text file. To import a cross section database from a spreadsheet or text file, use the following steps:

  1. Make certain you have created a 1D hydraulic cross section coverage in your project. This is needed in order to have a place to store the cross section database.
  2. If using a text file, make certain it is formatted correctly. It should include an XS ID or Station ID column in order to define the points found in each cross section.
  3. Open the cross section database file using any of the methods for opening a file. This will bring up the File Import Wizard.
  4. In the first step of the File Import Wizard, set the fixed width or delimited properties as appropriate for the file.
  5. In the second step of the File Import Wizard, set the data type to be "Feature Data" and turn on the "Cross section database" option.
  6. Also in the second step, assign the columns of the text file to make the station ID, and xyz coordinates. There is also an option for a PT type that allows you to annotate features such as thalweg, left bank, right bank, left toe, right toe, abutment, pier, and so on.
  7. When done with the File Import Wizard, clicking Finish will import the database in your SMS project. It can be reviewed by looking at the arc attributes of the cross section arcs.
The File Import Wizard for importing a cross section database

Once you’ve imported the cross section database, the cross section data is stored in the project file. Try out importing a cross section database into your SMS 13.1 projects today?

Blog tags: 

Using the Compute Derivative Tool in SMS

With the release of the SMS 13.1 beta, a new tool has been added to the Dataset Toolbox. The Dataset Toolbox contains many tools for creating new datasets from existing data in your project. The Dataset Toolbox contains the Data Calculator as well as tools for comparing datasets and completing certain functions.

Among all the tools currently available, the Compute Derivative tool has been added to the Temporal tools in the Dataset Toolbox. In a previous blog post we discussed the other temporal tools if you want to review the function of those tools. The Compute Derivative tool allows you to create a new dataset showing the change from one time step to the next, or the derivative from one time step to the next of an existing dataset.

To access and use the Computer Derivative tool, do the following:

  1. Have a transient dataset loaded into the project.
  2. Use the Data | Dataset Toolbox command.
  3. In the Dataset Toolbox dialog, select the Computer Derivative tool under the list of Temporal tools.
  4. Select the desired dataset to use for the computation.
  5. Select either the Change or Derivative option.
  6. If selecting the Derivative option, also specify the time units.
  7. Enter a name for the new dataset.
Compute Derivative Tool in SMS

The new dataset generated from the Computer Derivative tool will output data in between the existing dataset time steps, resulting in one fewer time steps than the original dataset.

The Compute Derivative tool is only available for data that is in the 2D Mesh module or the UGrid module. Make certain that you have your dataset included in one of these two modules. If you have your dataset in a different module, you will need to interpolate it over to a 2D mesh or UGrid (unstructured grid) before using the Computer Derivative tool.

Try out using the Compute Derivative tool in SMS 13.1 today!

Blog tags: 

Using Evaluation Versions of GMS, SMS, and WMS

Are you wanting to try out GMS, SMS, or WMS, but aren’t quite ready to commit to purchasing a license? Or maybe you have a license, but your maintenance has lapsed and you’d like to check out the new features in a beta version before updating your maintenance?

Aquaveo permits using an evaluation license for its products to permit you to try out our software to see if it will meet your needs. Evaluation licenses are temporary license codes that let you use all the functionality of our software for two weeks.

To receive an evaluation license code, do the following:

Use the evaluation code to register
  1. Download the software you want to evaluate from our downloads page.
  2. After downloading and installing the software, use the Request License button in the Registration Wizard to go to the Software Evaluation Request page on our website.
  3. Fill out the request form and an evaluation license code will be sent to you.
  4. Register the software using the evaluation license code sent to you.

After registering the software with the evaluation code you will be able to use all of the software functionality to determine if the software will meet your water modeling needs. Note that evaluation licenses are only for evaluation purposes and are not intended for creating finished models. It should also be noted that certain third party models, such as TUFLOW or Hydro AS-2D, will still require a separate license in order to fully evaluate them.

After the two week trial period, the license will expire and you will no longer be able to use the software until a paid license code is entered. You are only permitted one evaluation license per product per version.

If you encounter problems with registering an evaluation license, contact our support team at support@aquaveo.com. If you started an evaluation license and were unable to use the license during the evaluation period, contact our licensing team at licensing@aquaveo.com.

Blog tags: 

Pages