We use cookies to make your experience better. To comply with the new e-Privacy directive, we need to ask for your consent to set the cookies. Learn more.

2 Ways to Import ArcGIS Files into WMS
ArcGIS software has long been a standard in generating geographic data. It is likely you will have received a shapefile generated in ArcMap at some point. ArcGIS files can be imported into WMS to save you time in recreating geographic data.
There are two main methods for importing ArcGIS data: through the standard open dialog or through the GIS module.
Standard Method
To import ArcGIS files into WMS:
- Select the Open command in the File menu.
- Make certain the Files of Type field is set to "All Files" or "Shapefiles".
- Browse to your file and open it.
That’s all you need to do. You can also use any other standard methods for opening files such as using the Open macro or dragging the file onto the Graphics Window. There is also a command to open shapefiles in the Data menu in the GIS module.
Right-clicking on the the imported shapefile in the GIS module allows joining table and layer data. This data can then be mapped onto a coverage using the Shapes → Feature Objects command in the Mapping menu.
A grid coming from ArcGIS will be imported as a DEM in the Terrain Data module . A TIN will also be imported into the Terrain Data module.
GIS Module
When the GIS Module is active, you can use commands to directly import ArcGIS data into WMS. To do this:
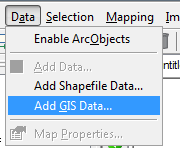
- Make certain the GIS module is active.
- Select the Data | Add Shapefile Data command.
- or
- Select the Data | Add GIS Data command.
- Use the file browser to locate your files and import them.
This second method is useful for a wider range of ArcGIS data files. If a file does not open correctly using the standard methods, then importing the file through the GIS module is recommended.
DEMs and TIN files opened through the GIS module will be imported into the GIS module instead of the Terrain module.
Take a look at what other GIS tools are offered in WMS.
April 18, 2018
|
View: 3139
|
Categories: WMS
|
By: <a class="mp-info" href="https://aquaveo.com/blog/author/admin">Aquaveo Staff</a>
About the Author

Performing a Silent Install of XMS (Passwords & Hardware Locks)
October 10, 2018
Computing Basin Curve Numbers in 9 Easy Steps
May 16, 2023
Converting a NET File to an INP File
May 9, 2018
Performing a Silent Install for ALS
October 27, 2021
Tips for Finding Information on the XMS Wiki
September 25, 2019
Best Practices for Modeling Complex Geometries
April 28, 2026
Managing MODFLOW 6 Data: Lists, Copy Period & CSVs
April 21, 2026
5 Concepts for Mastering Surface-water Modeling
April 14, 2026
Comparing Multiple Design Alternatives in One Project
April 7, 2026
Incorporating MODFLOW 6 Groundwater Energy (GWE)
March 31, 2026