We use cookies to make your experience better. To comply with the new e-Privacy directive, we need to ask for your consent to set the cookies. Learn more.
Using the Blend Arcs Tool
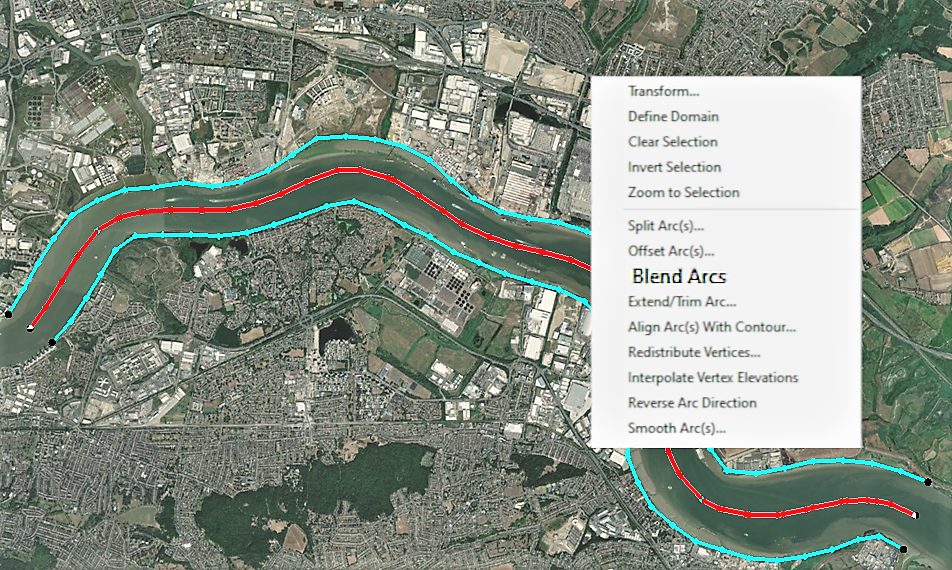
Sometimes it may be useful to have a quick way to create an arc that lies between two other arcs. For example, you might need to quickly create a centerline arc between two bank arcs. The Surface-water Modeling System's Blend Arcs tool, which is new to SMS in version 13.2, means that creating a blended arc is only a few clicks away.
There are many applications for the Blended Arc tool in SMS. As mentioned earlier, it can be used to find the centerline of a channel using the bank arcs. It can also be used for a quick way to find the arc in the center of a bridge, culvert, or weir.There are many other potential applications for this tool.

The steps to use the blended arc feature are:
- Create two arcs. The arcs can be parallel to each other, or even touching.
- After selecting both arcs, right-click in the graphics window and choose Blend Arcs from the menu.
The blended arc is immediately generated. This can only be done with two arcs, however the two arcs you pick don't have to be right next to each other. You can still find the blended point of two arcs that are separated by other features, such as other individual arcs or polygons.
When working around polygons in your project, If a polygon has been created in the space where the blended arc will appear, when the Blend Arcs tool is used, the polygon will retain its original shape despite the fact that there is now an arc splitting it. This could be useful for your project, but if you intend for the new arc to split the polygon into two new shapes, you only need to click the Build Polygons macro one more time and the new polygons will be created with this new division.
Try the new Blend Arcs tool in SMS 13.2 today!


