Calculate the Water Level Below the Top of an Aquifer
The Data Calculator is a useful feature that is available in the Groundwater Modeling System (GMS). The Data Calculator performs many functions and can enhance your project and simplify the visualization of data. This blog post will provide an overview of how to use the Data Calculator in GMS to pinpoint locations where the water level in a selected aquifer falls below the top elevation in a MODFLOW simulation.
As you might expect, a MODFLOW simulation containing aquifers needs to be completed before you are able to use the Data Calculator to find the time step where the water level falls lower than the top elevation in the simulation. The datasets required for this calculation are the top elevation dataset and the head dataset.
Before opening the Data Calculator, you will first need to duplicate the top elevation dataset. This is because the Data Calculator isn’t able to recognize the datasets directly under the MODFLOW simulation in the Project Explorer. Right-clicking on the top elevation dataset and selecting duplicate will create a copy of the dataset under the grid folder in the Project Explorer, and this duplicate can now be read into the calculator. If desired, you can right-click on the duplicate dataset and rename it to something that makes more sense to you.
The next step is to go to the Edit menu at the top of the screen and select Dataset Calculator to open the Data Calculator dialog. There is also a Data Calculator macro on the top row, which will bring up the same dialog. Follow these general steps to calculate the data once the Data Calculator is open:
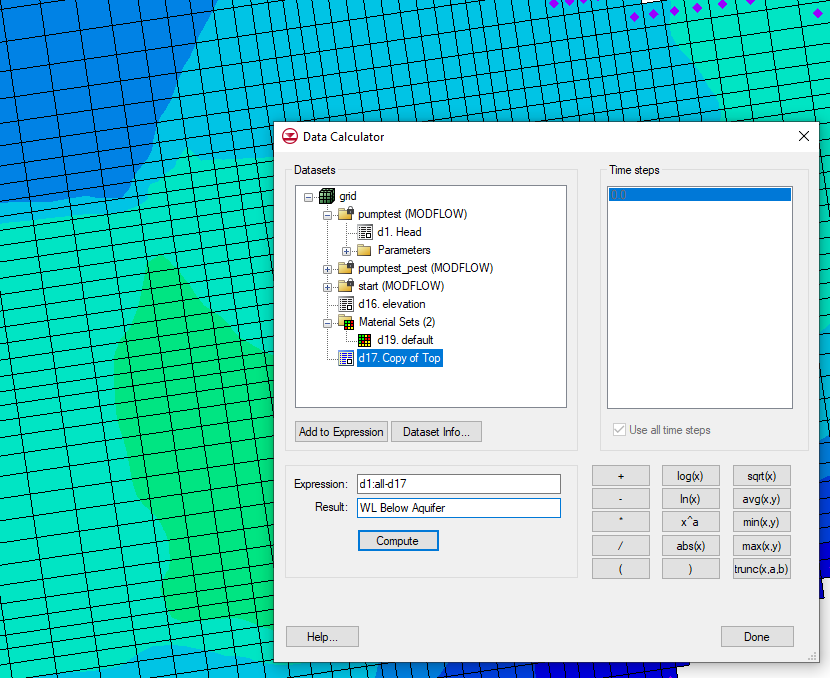
- On the left side of the dialog, find and select the Head dataset.
- On the right side of the dialog, either select a specific time step from the list, or check the box that says “Use all time steps”.
- Click the “Add to Expression” button to add the Head data at the selected time steps to the calculation.
- Click the subtraction button (-), or use your keyboard to type the subtraction symbol.
- Select the copy you made of the top elevation dataset and click “Add to Expression”.
- In the Result field, enter a name for the new dataset.
- Press Compute, then click done to close the dialog.
After generating the new dataset, you can right-click on it in the Project Explorer and select “View Values”, which will let you view the data values for the selected time step. Any values denoted by a negative number indicate a water level lower than the highest point of the aquifer.
Head over to GMS and see the many ways the Data Calculator feature can be useful to you and your project!


