We use cookies to make your experience better. To comply with the new e-Privacy directive, we need to ask for your consent to set the cookies. Learn more.

Using Display Options with Multiple UGrids
Have you experienced setting display options for an unstructured grid only to see those settings not take? In GMS, each unstructured grid (UGrid) uses its own set of display options. A common reason for display settings not appearing is selecting the wrong UGrid when you have multiple UGrids.
Changing the UGrid display settings will only affect one UGrid at a time. So it is important to make certain the correct UGrid display options are being changed.
There are three ways to reach the Display Options dialog for UGrids:
- Display Options macro
- Display Options command in the Display menu
- Display Options command in the UGrid Data right-click menu in the Project Explorer
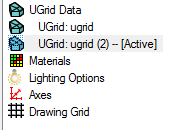
Once in the Display Options dialog, check to see which UGrid is active. This is done by looking a the list on the left side of the dialog. The list on the left will indicate which By default, the display option will be set for the active UGrid. So one method to make certain you are setting display options for the correct UGrid, it to make certain that UGrid is the active UGrid in the Project Explorer before entering the Display Options dialog.
The Display Options dialog can be used to change display settings for a UGrid that is not active. This is done by selecting the desired UGrid from the list on the left in the dialog. It should be noted that selecting a UGrid in th Display Options dialog does not cause the UGrid to become the active UGrid in GMS. So when you exit the Display Options dialog, you may need to change which UGrid is active in the Project Explorer to see the display setting changes.
It should be noted that which UGrid is active also matters when accessing the Dataset Contours Options dialog.
Hopefully, this helps clarify how to set display options in projects that have multiple UGrids. Make use of Ugrids disaply options in you project using GMS today!
September 11, 2019
|
View: 1711
|
Categories: GMS
|
By: <a class="mp-info" href="https://aquaveo.com/blog/author/admin">Aquaveo Staff</a>
About the Author

Performing a Silent Install of XMS (Passwords & Hardware Locks)
October 10, 2018
Computing Basin Curve Numbers in 9 Easy Steps
May 16, 2023
Converting a NET File to an INP File
May 9, 2018
Performing a Silent Install for ALS
October 27, 2021
Tips for Finding Information on the XMS Wiki
September 25, 2019
Comparing Multiple Design Alternatives in One Project
April 7, 2026
Incorporating MODFLOW 6 Groundwater Energy (GWE)
March 31, 2026
Essential DEM Clean-Up for Watershed Delineation
March 24, 2026
Essential Boundary Condition Guide
March 17, 2026
How to Delineate a Well Capture Zone Using MODPATH
March 10, 2026