Aquaveo & Water Resources Engineering News

New CityWater Pricing

Are you looking at using CityWater? CityWater is a great way to manage water distribution using cloud-based technology.

Recently, Aquaveo changed its pricing system for purchasing a CityWater license. The old system of standard and professional licensing has been modified. When purchasing CityWater, you can now configure CityWater to meet your needs.

Begin by going to the CityWater Pricing page. This page will show you all of the options that can be included in your license. The top of the page shows the core components included in all CityWater licenses. After the core components, a list of components included with each add-on package is shown. Make a note of the add-ons packages needed for your projects and the number of pipes in your largest project before clicking the Configure button.

On the CityWater License Configuration page, you will select the specific features for your license.

GSSHA

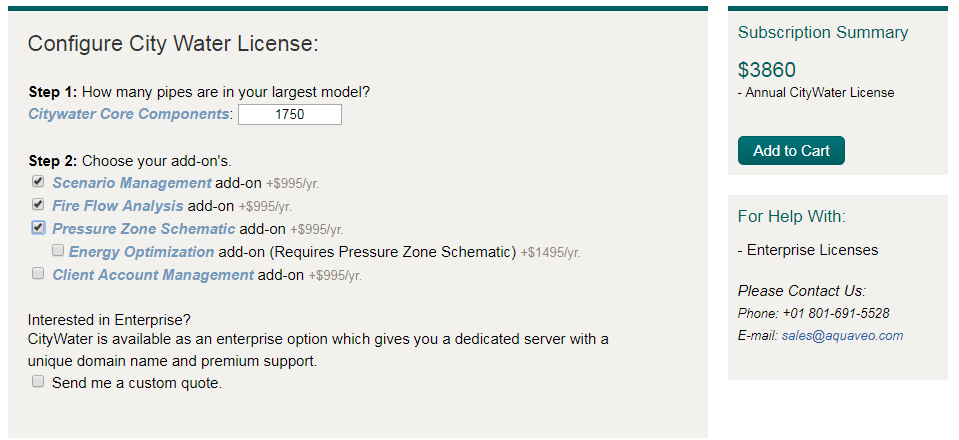
Start with entering the number of pipes in your largest EPANET model that will be used in CityWater. This does not limit the number of models that can be uploaded into CityWater, only the size of model. For example, if your largest EPANET model contains 1500 pipes, you could upload any number of models that contain 1500 pipes or fewer.

If later you find that you need to upload a larger model, contact Aquaveo to receive a quote for adding a larger model.

After entering the number of pipes for your largest model, you can select the packages to add to the license. The components of each package are described in the previous page. If later you discover you need a package that wasn’t originally purchased, contact Aquaveo to receive a quote.

Finally, if you are interested in purchasing an Enterprise License of CityWater, you will need to contact Aquaveo for a customer quote. The price for an Enterprise License depends on the number of additional licenses you will be acquiring and the components of each of those licenses.

When configuring your license, the Subscription Summary will automatically update with a quote based on the number of pipes in your largest model and the selected packages. Clicking Add to Cart will take you to the final page where you can review and pay for your order.

If you have any questions about purchasing CityWater or how CityWater can help you, don’t hesitate to contact us at sales@aquaveo.com.

Blog tags: 

Using the Channel Calculator in WMS

With WMS there is no need to sit and calculate your channel properties by hand, you can use the Channel Calculator to help you obtain the hydraulic data you need. The Channel Calculator, a function of the Hydraulic Toolbox, has the ability to give values for flow, depth, area of flow, wetted perimeter, hydraulic radius, average velocity and so much more. Even better, the Channel Calculator only requires some basic cross-section data including the slope and either the flow or depth of the channel.

This blog post will cover how to compute depths for your channels, which can be used to create floodplain delineation maps, and also how to generate rating curves for your channels, which can be used for things such as predictions. To get started, make sure you have cross-section arcs and river centerlines in your model.

To Compute Depths:

The Channel Calculator is a good tool for approximating channel flows or flow depths. Given a flow rate, the Calculator can compute a flow depth, and vice versa.

  1. In the Hydrologic Modeling Module, select Calculators | Channels to open the Channel Calculations dialog.
  2. Toggle on the Use Cross-Section Database option to enable the ability to import existing cross-section data.
  3. Click the Select Cross Section button to bring up the Assign Cross-Section dialog.
  4. Select your cross-section file along with the cross-section you would like to work with.

The cross section displays in the small graphics window of the Channel Calculations dialog. Adjust the Z scale using the drop-down menu to better visualize the cross section. With the cross section selected, set the necessary parameters to perform calculations for depths.

  1. Click the Launch Channel Calculator button to open the Channel Analysis dialog.
  2. Enter a value for Longitudinal slope. This is an estimate for the ground slope in the vicinity of your cross-section.
  3. Enter a value for the Flow or the Depth depending on which values you have and which ones you are trying to find.
  4. Select the Calculate button. This will populate the right-side of the dialog with hydraulic values calculated for the cross-section.
  5. Select the Create Stage Point button in the Channel Calculations dialog to create a stage point based off the values computed in the channel calculator. This is useful if you are planning to use the depths to delineate a floodplain later on.
To Generate a Rating Curve:

The Channel Calculator can also be used to create different rating curves, to be used to calculate things such as storage potential.

  1. Click on the Launch Channel Calculator button to open the Channel Analysis dialog.
  2. Select the Compute Curves button to open the Curve Selection dialog.

The default is to create a rating curve for the entered flow vs. depth for the selected cross section, but it’s possible to also create curves for all of the other options listed.

  1. When exiting the Curve Selection dialog, the selected rating curves are generated and the plot shouldappear.
  2. If you double-click in the rating curve plot window a dialog will appear that presents many different options for how you can use the rating curve, including an option to export the curve in a chosen format.

As you can see, with just a few steps, you can obtain the hydraulic data you need for your channels in WMS. Try it out today!

Blog tags: 

Saving Plots in SMS

After working to put together the perfect plot for your model to show what is going on, it’s nice to be able to keep that plot. Starting in SMS 13.0, you can save plot parameters with your project or for use in other projects.

Previously, SMS allowed exporting the plot as an image or text file, but it did not allow you to save a plot file that SMS could read to regenerate the plot in your project. Saving a plot allows the plot parameters to be used over and over again, saving you from needing to recreate the plot in the future.

To save a plot, do the following:

  1. After generating a plot, use the File | Save As command.
  2. In the Save As dialog, change Save as Type to “Plot File (*.plt)”.

Furthermore, if a plot window is open in SMS when you save your project, a PLT file will be generated to go with your project.

The PLT file that is generated can be opened in any instance of SMS. The file records the parameters used to generate the plot such as the selected datasets, observation arcs used, and plot display options.

GSSHA

Once the plot file has been saved, opening the file in SMS will regenerate the plot. SMS will attempt to recreate the conditions that existed in SMS when the plot was first saved. If the plot is imported into the same project where it was generated, it should appear the same.

If the plot is imported into a different project, SMS will try to match the conditions as closely as possible. For example, if the plot uses an observation arc, SMS will use the first observation arc it can find. If a mesh was used, then SMS will look for the same mesh. It will also look for the same dataset and if it cannot find it, then it will look for a dataset with the same name.

Test out saving plots in SMS 13.0 today!

Blog tags: 

Creating a Confined Aquifer

Does your MODFLOW model contain a confined aquifer? A confined aquifer layer is defined as "an aquifer below the land surface that is saturated with water. Layers of impermeable material are both above and below the aquifer, causing it to be under pressure so that when the aquifer is penetrated by a well, the water will rise above the top of the aquifer."

GSSHA

In MODFLOW, a layer is considered confined when the head in the cell is above the top of the cell. Additionally, any cell located above the water table will be unconfined because the head in those cells will be below the top of the cell.

The layers in your GMS MODFLOW model can be assigned as confined or convertible in any of the flow packages, such as in the LPF package. Other flow packages can be used as well, including the BCF, HUF, and UPW packages. When setting up the MODFLOW model, select the desired flow package in the MODFLOW Packages dialog. The selected flow package must be compatible with the specified MODFLOW version.

In any of the flow package dialogs, under the Layer Type subheading, a layer can be defined as "Confined" or "Convertible". "Convertible" means GMS will automatically assign the layer as confined or unconfined depending on the elevation of the water table in the simulation. Only one layer type can be assigned to each layer. By default, all layers are set to convertible unless specified otherwise.

When a layer is explicitly set to be confined, MODFLOW will use the thickness of the cell, rather than the saturated thickness, to compute a transmissivity value. It will not check for the unconfined condition in the layer.

After defining the layers as confined or convertible, you will have a confined aquifer for your simulation. Try using confined aquifer layers in your GMS models today!

Blog tags: