We use cookies to make your experience better. To comply with the new e-Privacy directive, we need to ask for your consent to set the cookies. Learn more.

Using the Channel Calculator in WMS
With WMS there is no need to sit and calculate your channel properties by hand, you can use the Channel Calculator to help you obtain the hydraulic data you need. The Channel Calculator, a function of the Hydraulic Toolbox, has the ability to give values for flow, depth, area of flow, wetted perimeter, hydraulic radius, average velocity and so much more. Even better, the Channel Calculator only requires some basic cross-section data including the slope and either the flow or depth of the channel.
This blog post will cover how to compute depths for your channels, which can be used to create floodplain delineation maps, and also how to generate rating curves for your channels, which can be used for things such as predictions. To get started, make sure you have cross-section arcs and river centerlines in your model.
To Compute Depths:
The Channel Calculator is a good tool for approximating channel flows or flow depths. Given a flow rate, the Calculator can compute a flow depth, and vice versa.
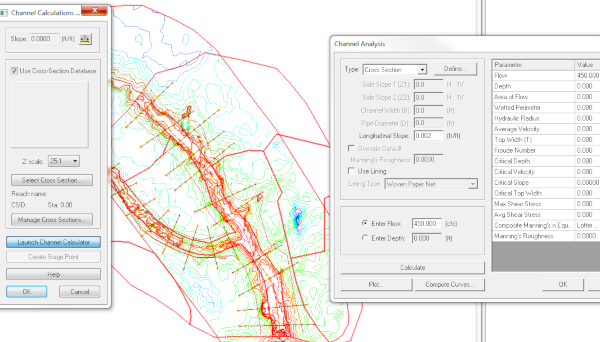
- In the Hydrologic Modeling Module, select Calculators | Channels to open the Channel Calculations dialog.
- Toggle on the Use Cross-Section Database option to enable the ability to import existing cross-section data.
- Click the Select Cross Section button to bring up the Assign Cross-Section dialog.
- Select your cross-section file along with the cross-section you would like to work with.
The cross section displays in the small graphics window of the Channel Calculations dialog. Adjust the Z scale using the drop-down menu to better visualize the cross section. With the cross section selected, set the necessary parameters to perform calculations for depths.
- Click the Launch Channel Calculator button to open the Channel Analysis dialog.
- Enter a value for Longitudinal slope. This is an estimate for the ground slope in the vicinity of your cross-section.
- Enter a value for the Flow or the Depth depending on which values you have and which ones you are trying to find.
- Select the Calculate button. This will populate the right-side of the dialog with hydraulic values calculated for the cross-section.
- Select the Create Stage Point button in the Channel Calculations dialog to create a stage point based off the values computed in the channel calculator. This is useful if you are planning to use the depths to delineate a floodplain later on.
To Generate a Rating Curve:
The Channel Calculator can also be used to create different rating curves, to be used to calculate things such as storage potential.
- Click on the Launch Channel Calculator button to open the Channel Analysis dialog.
- Select the Compute Curves button to open the Curve Selection dialog.
The default is to create a rating curve for the entered flow vs. depth for the selected cross section, but it’s possible to also create curves for all of the other options listed.
- When exiting the Curve Selection dialog, the selected rating curves are generated and the plot shouldappear.
- If you double-click in the rating curve plot window a dialog will appear that presents many different options for how you can use the rating curve, including an option to export the curve in a chosen format.
As you can see, with just a few steps, you can obtain the hydraulic data you need for your channels in WMS. Try it out today!
February 20, 2019
|
View: 2525
|
Categories: WMS
|
By: <a class="mp-info" href="https://aquaveo.com/blog/author/admin">Aquaveo Staff</a>
About the Author

Performing a Silent Install of XMS (Passwords & Hardware Locks)
October 10, 2018
Computing Basin Curve Numbers in 9 Easy Steps
May 16, 2023
Converting a NET File to an INP File
May 9, 2018
Performing a Silent Install for ALS
October 27, 2021
Tips for Finding Information on the XMS Wiki
September 25, 2019
Managing MODFLOW 6 Data: Lists, Copy Period & CSVs
April 21, 2026
5 Concepts for Mastering Surface-water Modeling
April 14, 2026
Comparing Multiple Design Alternatives in One Project
April 7, 2026
Incorporating MODFLOW 6 Groundwater Energy (GWE)
March 31, 2026
Essential DEM Clean-Up for Watershed Delineation
March 24, 2026