Aquaveo & Water Resources Engineering News

4 Ways to Screen Capture in WMS

Are you needing to capture a screenshot of your WMS model? Fortunately, there are multiple ways to get a screenshot from WMS. This blog article will discuss four methods for using screen capture in WMS; two that use built-in Microsoft Windows capabilities and two that make use of the innate capacity of WMS.

Windows Methods

Microsoft Windows has a couple of innate methods for making a screen capture. One way is to use the Print Screen command found on the keyboard. This command will copy an image of the WMS screen into the computer's memory where the image can later be pasted into another program. Holding down the Alt key while using the Print Screen command method will limit the image to just the WMS interface if it is in the active window. This method, however, has one disadvantage considering that the captured image often needs editing.

Another method is to use the Snip tool. This tool initiates dragging a rectangle around the WMS interface. Like the Print Screen key, this saves the image in your computer’s memory which later needs to be pasted into a seperate program. This method has the advantage of allowing you to get a cropped version of the image.

Neither of the screen capture methods using the native Windows tools directly results in a usable image file.

WMS Methods

Using the WMS screen capture methods, a usable image file can be easily obtained. The Save As command and the Screen Capture command both create an image file that contains exactly what is displayed in the Graphics Window at the time the file is saved. This can help avoid having to copy and edit the image in a graphics software program.

To use the Save as command, go to File | Save As. In the Save As dialog, change the file type to be "JPEG Image File (*.jpg, *.jpeg)".

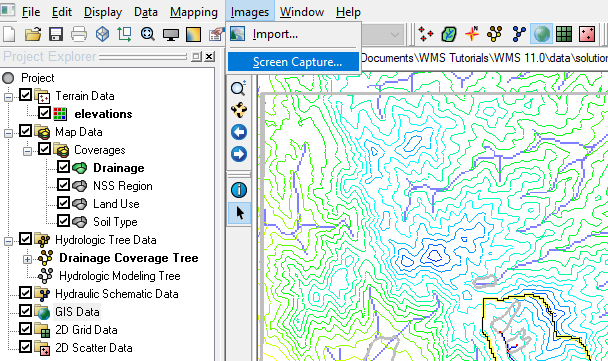
To use the Screen Capture command, make the GIS module active. Use the Image | Screen Capture command. In the save dialog that appears, save out the screen capture as a bitmap image.

Screen Capture command

Try out the screen capture capabilities of WMS today!

Blog tags: 

Viewing Flood Extents in SMS

For many riverine projects, finding areas of potential flooding is a key component. SMS offers a few ways to see the flood extents in a given project.

When running a riverine numeric model, such as SRH-2D, a dataset of the water surface elevation (WSE) is often part of the resulting solution. Using the contours and time steps of the WSE dataset can help locate the flooded areas and extents within the modeled area.

You can use the “max” function in the data calculator to make a dataset showing the maximum water surface elevation across all timesteps. For example, using a WSE dataset, you would enter "max(WSE:all)" to get the maximum value for the WSE dataset across all time steps. This would then show the maximum extents.

A faster way to view floodplain data for a single time step is to use the Map Flood command. This tool utilizes ground elevations and existing flood hazard maps from the Federal Emergency Management Agency (FEMA) to quickly visualize the impacts of possible modifications in the flood level. The Map Flood tool works with FEMA flood hazard data allowing you to avoid building and running an entire numeric model in order to obtain a quick estimate of the flood areas for a single time step.

Flood Extents using Map Flood

The Map Flood tool can also be used for a single time step with local data for areas where FEMA data is not available. More information about the Map Flood tool is found in the Fast Floodplain tutorial.

You can share the flood data you’ve generated by exporting a WSE or max WSE dataset in a variety of file formats using either the right-click Export command or the File | Save As command. The feature arcs created using the Map Flood can also be saved as a shapefile or any other available file format.

Try out the tools in SMS for viewing flood extents today.

Blog tags: 

Sharing Display Themes in GMS

Display themes make showing off your groundwater model easier. A display theme is a set display parameters that can be saved in a project to be used repeatedly. But, after creating a display theme that works well, have you ever wanted to use that same display theme for a different project?

Display Theme Example

In GMS, display themes are saved with the project file. Therefore, importing a display theme into another project isn’t quite as simple as importing a raster file or image. However, the process isn’t all that complicated either.

To import a display theme from an existing project into a new project, do the following:

  1. Open the project with the display theme you want to import to other projects.
  2. Remove everything from the project except for the desired display theme.
  3. Use the Save As command to save the project with a different name. The project should only contain the display theme.
  4. Open the project that is to receive the display theme.
  5. Select the File | Open command.
  6. In the Open dialog, select the project containing the display theme and turn on the Import into current project option before clicking the Open button.

Using these steps will add the display theme to the existing project. The new display theme will appear in the Project Explorer.

Note that this project requires using the File | Open method of importing a file. The Open macro can also be used. Other methods for importing files into GMS, such as drag-and-drop, will not work.

Also, be aware that when importing a display theme into an existing project, the display theme will only work with data like that in the original project. For example, a display theme built for a project using 3D UGrids will not work with a project that uses 2D grids.

Display themes are a great tool for visualizing your data in GMS. Try saving and sharing them in GMS today!

Blog tags: 

Importing and Exporting Shapefiles

If you have data in GMS, SMS, or WMS that needs to be shared with another application, one of the easiest ways to share this data is through shapefiles. GMS, SMS, and WMS can all import and export shapefiles, though there are some differences between them. This article goes over some of those differences.

Importing Shapefiles

When you import shapefiles into GMS, SMS, or WMS, they will be loaded under the GIS module. Shapefiles can be imported just like any other file using the File | Open command, the Open File macro, or dragging the file icon on the interface. From there, you can use the conversion commands to move the shapefile data into other modules.

Exporting Shapefiles

Though GMS, SMS, and WMS have a lot of similarities they each vary from the other when it comes to saving a shapefile. In general DEMs, TINs, feature objects, and grids can be saved through the right-click menu in GMS; the file menu in SMS; and through both the right-click menu and file menu in WMS.

GMS
Export command

Shapefiles can be exported through the right-click menu.

  1. Right-click on the item in the Project Explorer and select Export to bring up the Export dialog.
  2. In this dialog you can change the "Save as type" to "Shapefile (*.shp)".

The following items can be exported as shapefiles.

  • TINs
  • 3D Grids
  • Feature Objects
  • DEMs
SMS

Shapefiles can be exported through the File menu.

  1. Select the item in the Project Explorer, then File | Save As to bring up the Save As dialog.
  2. In this dialog you can change the "Save as type" to "Shapefile (*.shp)".

The following items can be exported as shapefiles.

  • Scatter Sets
  • 2D Grids
  • Feature Objects
  • Raster Files
WMS

Shapefiles can be exported through the right-click menu and through the File menu.

  1. Select the item in the Project Explorer, then File | Save As to bring up the Save As dialog.
  2. In this dialog you can change the "Save as type" to "Shapefile (*.shp)".
  3. Alternatively, you can right-click and select Save As to bring up the same dialog.
The following items can be exported as shapefiles.
  • TINs
  • 2D Grids
  • Feature Objects
  • DEMs

Now that you know a little more about using shapefiles in XMS, try using them in your GMS, SMS, or WMS projects today!

Blog tags: 

Happy New Year from Aquaveo!

Happy New Year!

We hope you had a great 2019 and will have an even better 2020. At Aquaveo, we are excited for 2020. We have many projects in the works and can’t wait to be able to show them to you.

Here is some of what Aquaveo plans to bring you in the coming year:

  • GMS 10.5 which will include expanded functionality for using MODFLOW 6.
  • SMS 13.1, including improvements for ADCIRC and SRH-2D.
  • New Tethys web-applications including AGWA, a web-based application for GSSHA.

We look forward to seeing you in the coming year. Keep checking our website for news and updates.