Aquaveo & Water Resources Engineering News

Using Evaluation Versions of GMS, SMS, and WMS

Are you wanting to try out GMS, SMS, or WMS, but aren’t quite ready to commit to purchasing a license? Or maybe you have a license, but your maintenance has lapsed and you’d like to check out the new features in a beta version before updating your maintenance?

Aquaveo permits using an evaluation license for its products to permit you to try out our software to see if it will meet your needs. Evaluation licenses are temporary license codes that let you use all the functionality of our software for two weeks.

To receive an evaluation license code, do the following:

Use the evaluation code to register
  1. Download the software you want to evaluate from our downloads page.
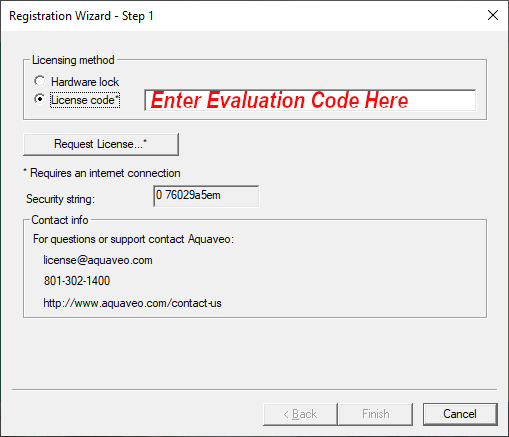
  2. After downloading and installing the software, use the Request License button in the Registration Wizard to go to the Software Evaluation Request page on our website.
  3. Fill out the request form and an evaluation license code will be sent to you.
  4. Register the software using the evaluation license code sent to you.

After registering the software with the evaluation code you will be able to use all of the software functionality to determine if the software will meet your water modeling needs. Note that evaluation licenses are only for evaluation purposes and are not intended for creating finished models. It should also be noted that certain third party models, such as TUFLOW or Hydro AS-2D, will still require a separate license in order to fully evaluate them.

After the two week trial period, the license will expire and you will no longer be able to use the software until a paid license code is entered. You are only permitted one evaluation license per product per version.

If you encounter problems with registering an evaluation license, contact our support team at support@aquaveo.com. If you started an evaluation license and were unable to use the license during the evaluation period, contact our licensing team at licensing@aquaveo.com.

Blog tags: 

Customizing the Simulation Commands in SMS

In SMS 13.1 beta, did you know that you can customize the commands in the simulation right-click menu? Customizing the right-click commands can help declutter the menu. For models such as ADIRC or SRH-2D, the right-click menu can be customized to show the commands you use most often. For example, if your workflow calls for saving the project, exporting the simulation files, and launching the simulation run every time, you may not want to have separate commands for each of those, instead just having one command showing all of those.

Starting with SMS 13.1.6, the Preferences dialog contains options for customizing the right-click menu commands for simulations. These commands include commands for exporting the simulation files, saving the project, and launching the simulation. Commands preferences can be set for the menu for simulations as well as for the Simulation Data folder in the Project Explorer. Setting the commands for the Simulation Data folder apply to all simulations in the project.

To customize the simulation commands, do the following:

  1. Open the Preferences dialog by using Preferences command in the Edit menu.
  2. In the Preferences dialog, go to the Project Explorer tab.
  3. Click the Edit button next to simulation right-click menu options to open the Simulation Menu Preferences dialog.
  4. Turn on or off the options in the Simulation Menu Preferences dialog to customize the commands in the simulation menus.
Customizing the simulation menu

When using the Simulation Menu Preferences dialog, make certain you turn on or off commands in the correct column. Also note that saving the simulation exports the simulation files and does not include saving your SMS project; there are two separate processes.

Being able to customize your simulation menu is a new feature that is only available for certain models. Older models, such as TABS or TUFLOW, do not have this option at this time.

Try out customizing your simulation menu in SMS 13.1 beta today!

Blog tags: 

Zooming with Annotations

Do you have a location in your GMS groundwater project that requires you to zoom in and out of a particular location frequently? It sometimes can become tedious to constantly have to locate the same area in the project and manually zoom in on that area using the Zoom tool. The annotation tools provide a way to make this process easier.

Zooming using the annotation tools requires the use of the Zoom to Layer command. This is done by doing the following:

  1. Create a new world space annotation layer. It is important that the annotation layer be set to use the world space which makes use of the project projection. Using annotation layers set to screen space will not work.
  2. Create annotations that mark out the zoomed in area. Using the Create Rectangular Object tool often works best for this task. Make certain that all objects added to this annotation layer are within the zoom in area.
  3. In the Project Explorer, right-click on the annotation layer and select Zoom to Layer. This will frame the project to the extent of the annotation objects.
Zoom to Layer command with Annotations layer

Following this method, you can zoom or pan to other locations in the project and quickly return to the area marked by the annotation layer by using the Zoom to Layer command. If there are multiple areas of interest in the project, create a separate annotation layer for each area you want to zoom in on. Doing that can make navigating around the locations of your project easier.

While we discussed doing this in GMS, it can also be done in SMS for surface-water projects. The annotation tools are similar in SMS and the Zoom to Layer is available for annotation layers in the Project Explorer.

Try out using annotations to navigation your groundwater project in GMS today!

Blog tags: 

Reviewing Aquaveo Licensing Information

In order for your Aquaveo software (GMS, SMS, WMS) to function correctly, it must be licensed correctly. It also must have all the correct components licensed for you to run the packages you have purchased. When you encounter an issue with your license, you can review your license information in order to know what to do.

To see your license information, do the following:

  1. Go to the Help menu and select the Register command.
Example of the Register Dialog

In the register dialog you will see your license information, including your license number, license expiration date, and maintenance expiration date. The license number will often be needed when contacting Aquaveo for support. The license expiration date shows when your license will expire, after which you will no longer be able to use the software without a new license. The maintenance expiration date is different from the license expiration date. The maintenance expiration date is the date after which you will no longer be able to receive technical support or access newer versions of the software including bug fixes.

In the register dialog you will also see a list of components enabled with your license. Components include numerical models, interface options, and tools that can be purchased with a license for our software. Review this list to make certain that you have all of the components you expect to find with your license. There is an option at the top of the dialog that can be turned off to see components that have not been enabled.

Often when a component is not enabled, this is because that component was not part of the license package that you purchased. Components can be purchased as part of a license package or purchased individually. To add a component to your license, contact our sales team at: sales@aquaveo.com

If you find that a component is not enabled that you believe should be enabled, contact Aquaveo’s licensing team at: licensing@aquaveo.com

If you are experiencing trouble registering your license or accessing a component of your license, contact our technical support team at: support@aquaveo.com

Blog tags: