Tips for Importing Wells to the Conceptual Model
By aquaveo on October 14, 2020In many MODFLOW projects, having the correct placement and settings for wells is important for getting correct results. GMS facilitates the implementation of wells by allowing well data to be imported directly into the conceptual model. This article gives an overview of importing well data directly into the conceptual model along with some tips.
Importing wells directly into the conceptual model first requires that the wells be in a file with the correct format. Typically this is a text file. Please refer to our wiki article for the correct format that GMS will use.
Other file formats, such as shapefiles, are also common, but often cannot be imported directly into the conceptual model. These other formats will import the wells into a different module, such as the GIS module, and will need to be converted over to the conceptual model.
Before importing well data into the conceptual model, make certain you have an existing map coverage with the well option turned on. Without this, the well data cannot be imported directly to the conceptual model.
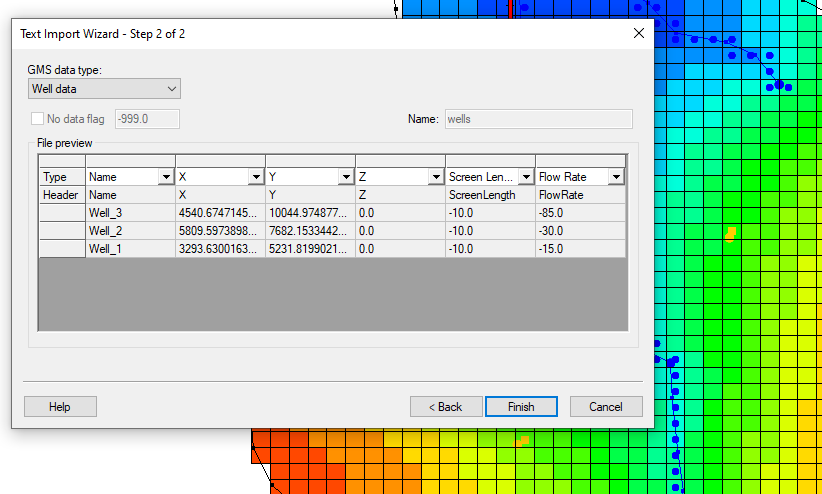
When importing well data in a text file, you will use the Open command then the Import File Wizard. In the second step of the File Import Wizard, you must select "Well data" for the GMS data type. Also in the second step, make certain all the data columns are correctly assigned. Failing to assign the data columns correctly can result in errors.
It should be noted that you are not limited to the number of data columns you have in the file. Therefore, you can import multiple wells at the same time. You can also import multiple time series or other data applicable to the wells using this method. Please note that while the wells and time series can be defined in the same text file, it is necessary to import the file twice: once to create the wells, and once to assign the time series to the wells. Constant flow rates can be imported at the time of well creation.
Review the well data after it has been imported. That can be done quickly by bringing up the coverage attribute table dialog for the wells. If the data was not imported correctly, minor changes can be made in using the tools in GMS.
Try out importing well data directly into the conceptual model using GMS today!