XMS

Changing Ports for Aquaveo Licenses

Sometimes it may be beneficial to change the license location for one or more of our XMS (GMS, SMS, and WMS) software on your computer. There are a number of reasons to do this, including to increase security and flexibility. The port number has to be changed in two locations for the port to be switched over properly.

First, open the Aquaveo License Registration dialog. This dialog comes up when you first download the software so you can enter the licensing information. If you've already done this, the dialog can also be accessed by selecting Register… under the Help menu. After opening Aquaveo License Registration, do this to change the port number:

  1. Select the Advanced Options… button.
  2. At the top of the dialog, click the Change Location… button.

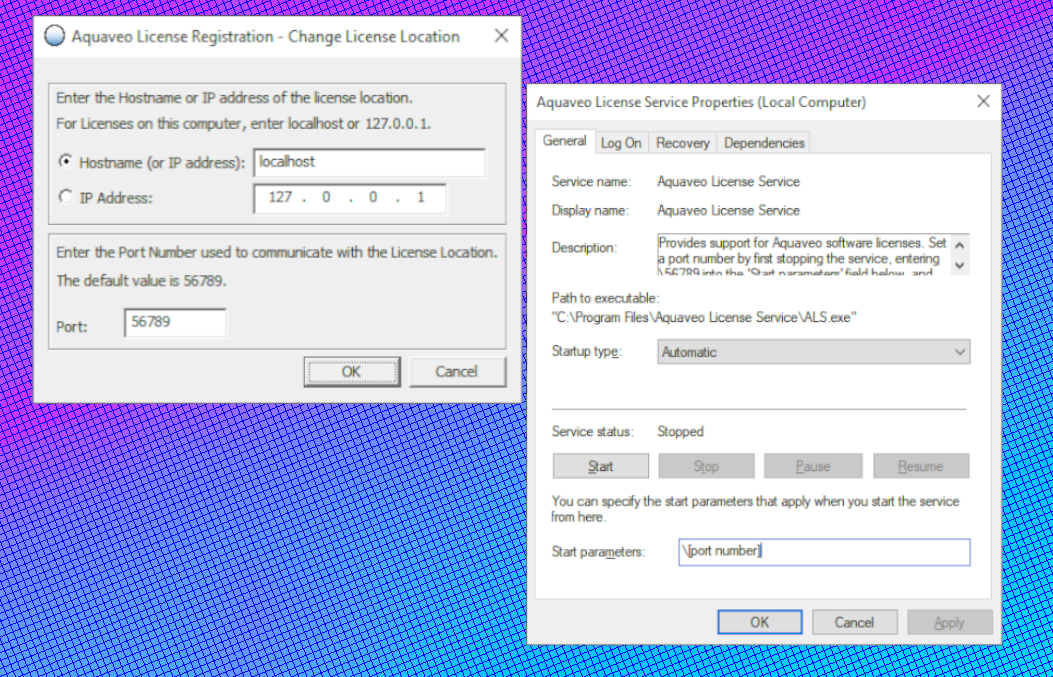
A dialog labeled Aquaveo License Registration – Change License Location will open. This dialog shows the IP address that is currently being used, as well as the current port number. This is where you can change the port number.

Changing XMS Port License

The other location the port number needs to be changed In order to switch over properly is the Aquaveo License Service Properties. Follow these instructions to open ALS Properties:

  1. Open the Services app. This can be found by typing "services" into the search on your taskbar.
  2. In the list of services, find "Aquaveo License Service" and select Properties.
  3. On the General tab at the bottom click Stop.
  4. In the Start Parameters, type the new port number with a backslash (\) in front of it.
  5. When you are finished, click Start.

The port location change won’t be complete until the port number is changed in both the Aquaveo License Registration and the Aquaveo License Service Properties.

Open any of the XMS software and check out how you can change the license location today! If you have more questions about licensing, contact our Licensing Support by emailing licensing@aquaveo.com.

Blog tags: 

Tips for Locating the Correct Projection

It is crucial that data brought into GMS, SMS, or WMS contain the correct coordinate system. The coordinate systems are designated through the use of projections. But what do you do if you import data and it doesn’t have the correct projection information or is missing projection information all together?

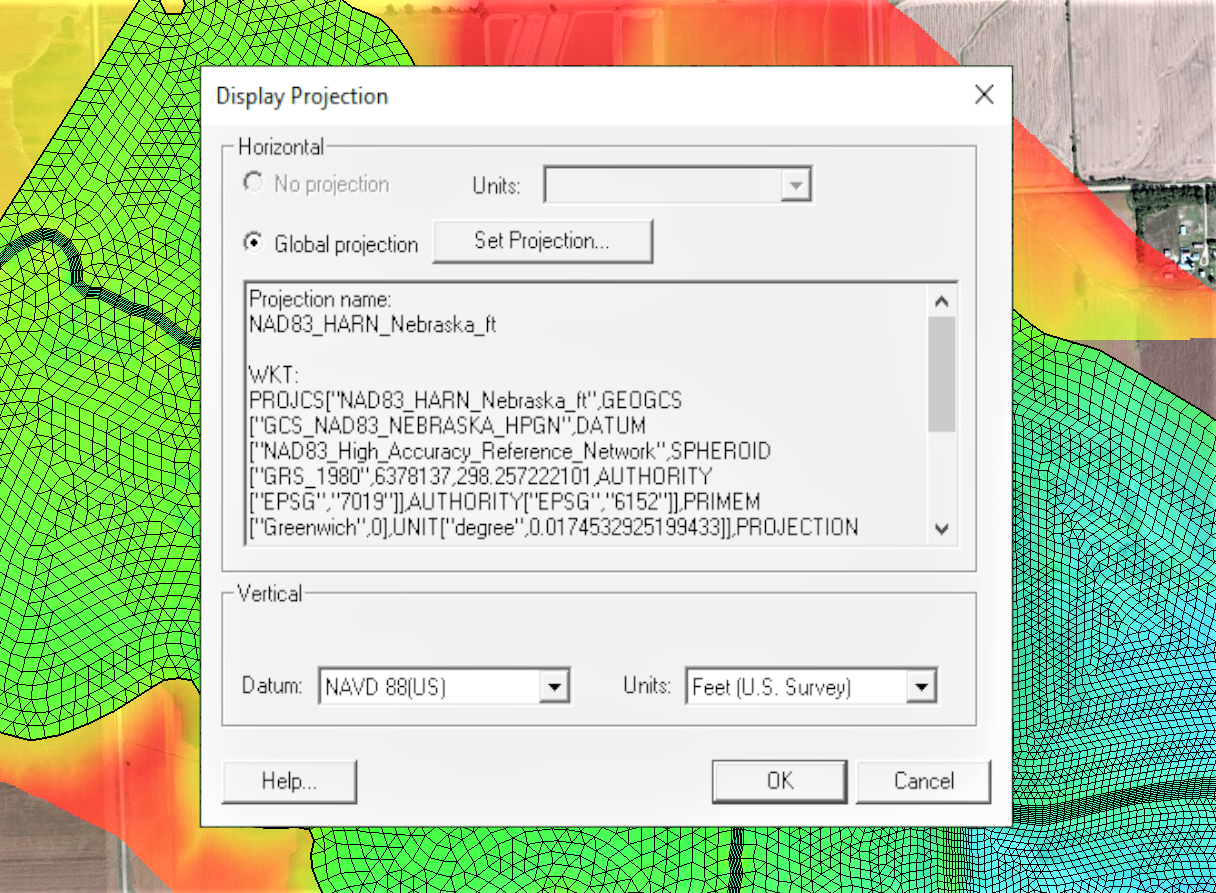
Example of The Display Projections dialog

If you know what projection the data is supposed to be set to, use either the Display Projection dialog to set the projection for the project or right-click on the data in the Project Explorer to set the object projection. It is recommended that all data in a project use the same projection. To set the projection using the Projection dialog, do the following:

  1. Go to the Display menu at the top of the window and select Display Projection. This will bring up the Display Projection dialog.
  2. Under the Horizontal section, if “No projection” is selected, change it to “Global projection”. If “Global projection” is already selected and you want to change the projection, select the Set Projection… button.
  3. /From the dialog that opens, you can search through the provided database for the correct projection, or you can import a projection (*.prj) file from outside the application.

More information about the Display Projection dialog can be found here [2]. The object projection is set through the Project Explorer right-click menus, but otherwise follows a similar workflow.

If you already have data imported into the project that has the correct projection, see if you can reproject the data with the incorrect or missing projection. In general, you can reproject the data by right-clicking on a specific data object in the Project Explorer. With SMS, you can also go to the Display menu at the top of the window and select Reproject All… to reproject the data all at once.

If you don’t have a projection, use the Online Maps tool to locate the correct area in the world, then download the data using Online Maps to obtain coordinate data. Set your data to use this projection. Make certain the data lines up correctly with the downloaded data.

Rarely, the project information is included in the data but XMS fails to read the projection. This is often the result of a formatting issue. Try opening the file in a text editor to see what projection information is there. Then either adjust the formatting so XMS can read the projection information, or set the projection for the data after importing.

Head over to any of the XMS products and see how projections work today!

Blog tags: 

Switching Model Executables

The Groundwater Modeling System, Surface-water Modeling System, and Watershed Modeling System (collectively known as XMS) applications make use of multiple numerical models. XMS is packaged with the executables for each of these numerical models. At times, you may need to switch out which numerical model executable XMS uses.

In general, you will want to use the model executable that comes packaged with the XMS. XMS is coded to work with the specific model executables that are distributed with each version of the software.

There are some reasons you might want to change which model executable it used. It might fix a bug with the model executable. It might get you access to features in an older or newer version of the model executable. It might also help you test issues with the numerical model. Replacing the model executable isn't guaranteed to help with any of these, but it is one option for troubleshooting with all of them.

For all XMS applications, the numerical model executables to be used are selected in the Preferences dialog. If you already know where the model executable is, you can copy and paste the executable into the preferences dialog. To do so, use the following workflow:

  1. Copy the executable file path. If using Windows 11, right-click on the desired model executable and select "Copy as Path."
  2. If using Windows 10, open the Properties dialog from the right-click menu. Copy and paste the location path into a text document. Then, make sure to grab the file name ending in ".exe" as well. The executable path will be incomplete without that file name.
  3. In your XMS software, open the Preferences dialog from the Edit menu.
  4. Find the model executable that you want to change and click on the file path next to the name or the Browse button.
  5. In SMS or WMS, this will bring up an Open dialog. In the File name box, paste in the new executable path. If you are using Windows 11, make sure to delete the quotation marks at the beginning and end. Selecting Open saves the new model executable.
  6. In GMS, the model executable is editable without bringing up the Open dialog. Simply erase the former executable path and paste in the new one. As long as the path is a valid path and the path ends in ".exe", GMS will save it. Again, for Windows 11, delete the quotation marks.
  7. Finalize the model executable by clicking OK to exit the Preferences dialog. Otherwise, the executable will not save.
Example of model executables in the Preferences dialog

Now, there are some issues to keep in mind. As mentioned earlier, changing out a numerical model executable is not guaranteed to fix a particular issue or even improve the situation. Older or newer versions of the model executable may not always be compatible with your version of XMS. Sometimes the model executable is not compatible with a particular project. The new executable might even worsen the situation. If any of these things happen, you can reintroduce the original executable.

Check out the available model executables in XMS today!

Blog tags: 

Hardware Guidance for XMS

Are you wondering about what computer system to use with GMS, SMS, or WMS (collectively known as XMS) to get the best performance? The hardware you select will certainly make a difference in how XMS performs. This blog post intends to give some guidance for selecting hardware for use with XMS.

What hardware is required will depend very much on which models you choose to run and how large the projects are. Many lower power systems will technically run the software, but the interface may be slow and the simulation may take a very long time to run. In the end, the computer components you choose will depend on what you intend to do and the budget you have to work with. To help in the decision-making process, we have included some recommendations and explanations on how different components will affect the performance of the software. Look at your budget and see what is reasonable; it is recommended that you get the best you can afford.

Example of System Hardware for XMS

For some basic system requirements, you can check out this page on our wiki. Note that these requirements will change over time as technology evolves. The system requirements will change as future advancements are implemented into XMS.

The CPU is the component that will make the most difference in how fast the software runs. When comparing CPUs, we recommend looking at single-core rather than multi-core performance. The reason for this is that many of the models in our software do not take full advantage of multiple CPU cores at the same time. That being said, we do recommend that the CPU have at least 4 cores to give everything the power that it needs. Remember that it should be the best that you can afford

For RAM, 16 GB is usually sufficient, but some very large projects have required more. You may also want to get more RAM if you plan to have more than one project open at the same time. Our office computers have 16-32 GB of RAM, depending on the machine.

For a graphics card, we recommend getting a current low to mid-range dedicated card designed for gaming. Large projects can require multiple gigabytes of VRAM, but our cards with 4GB have yet to run into issues needing more. The speed of the GPU will particularly affect how smoothly the pan, zoom, and rotate tools work.

For storage, we usually recommend having an SSD with plenty of space. Projects can end up taking quite a bit of disk space, especially if the Save As function is used frequently. Having faster storage will reduce project load times and how long it takes to save a project. Note that storing projects on external/network drives have been known to cause issues, so we recommend storing any project files you plan to open on a local drive. Again, it is recommended that you get the best you can afford.

Having the right hardware will increase the usefulness of XMS for your modeling projects. Check out the XMS software applications today!

Blog tags: 

Pages