Using the Select/Delete Data tool in SMS
By aquaveo on March 25, 2020Do you have a project that requires selecting a specific region of a mesh or grid to properly gather the necessary data for that area? For example, perhaps you need to select the mesh elements in the area of a bridge so that the elements can be refined. In order to accomplish either of this, there are a couple of options.
One option is to change the attributes directly within an already established mesh or grid by selecting individual cells, elements, or nodes. This could be very time consuming in a large mesh or grid.
Other selection tools, such as the Select by Poly tool, could be used. However, another option is to use the Select/Delete Data tool in SMS.
The Select/ Delete Data tool uses a polygon in the Map module to select objects in a grid, or mesh. It can also be used for selecting points or triangles in a scatter set or feature objects on a different map coverage. This can go quickly if you already have the desired polygon created on a map coverage, such as a materials coverage. Furthermore, the tool can be used to delete objects inside the select polygon.
Only a few steps are needed in order to use the Select/ Delete Data tool.
- After locating the area that needs to be altered, use the Create Feature Arc tool to enclose the desired area or use an existing polygon.
- Next, build a polygon using the Feature Objects | Build Polygons menu command if you are not using an existing polygon.
- Select the polygon using the Select Polygon tool.
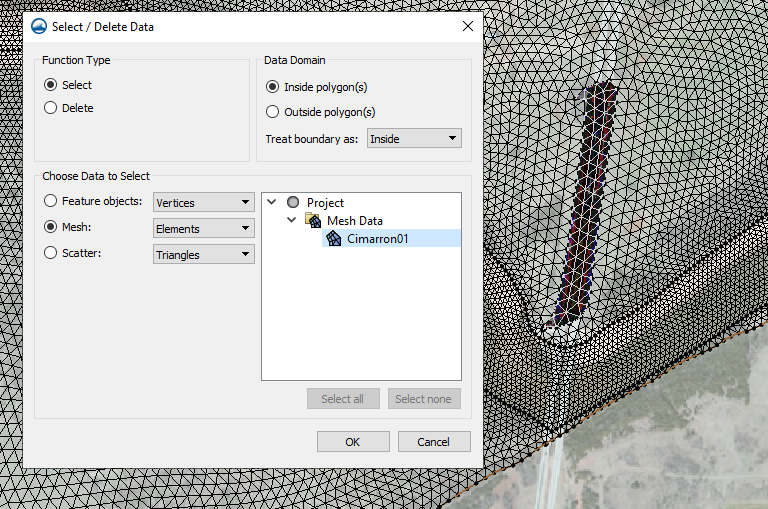
- Select the Feature Objects | Select/ Delete Data menu command.
- In the Select/Delete Data dialog, choose whether to select or delete the data and which data the function should be applied to.
The data options to choose from are based on what is in the project. You can also select what object in the data object to select or delete. For example, with a 2D mesh, you may choose to select the mesh elements, nodes, or duplicate nodes.
Try out the Select/Delete Data tool in SMS today!