Using the UPW Package for MODLFOW-NWT
By aquaveo on June 22, 2022Do you have a groundwater model that might benefit from using the UPW package in GMS? The Upstream-Weighting (UPW) package is one of the four available options for flow packages for MODFLOW. It is used for calculating intercell conductances in a different manner than is done in the Block-Centered Flow (BCF), Layer Property Flow (LPF), or Hydrogeologic-Unit Flow (HUF) packages.Rather than the discrete approach of drying and rewetting that is used by the BCF, LPF, and HUF Packages, the UPW package treats nonlinearities of cell drying and rewetting by use of a continuous function of groundwater head.
In order to use the UPW, you first need to have a MODFLOW-NWT simulation as part of your groundwater model in GMS. Once you have selected the MODFLOW-NWT version, you can use the Packages dialog to activate the UPW package.
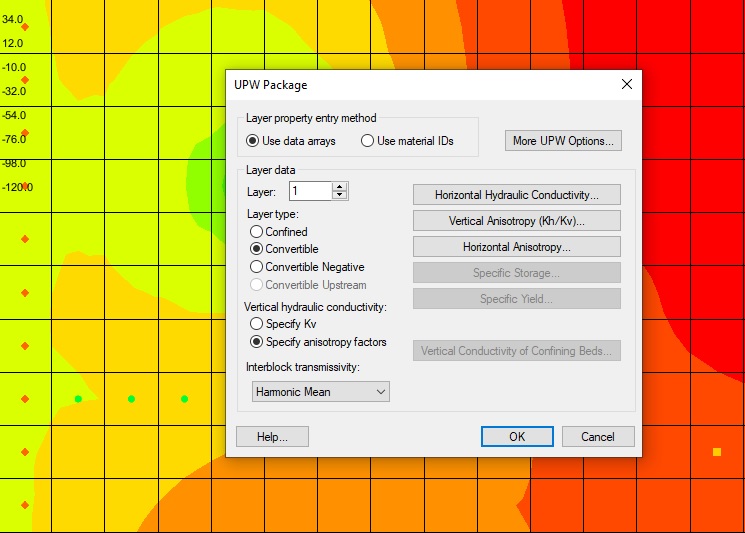
The UPW flow package is based on the LPF package but differs in that the rewetting and vertical conductance correction options are not available. Otherwise, the UPW package allows you to work with both confined and convertible layers. It also has options for vertical hydraulic conductivity and interblock transmissivity. Array values can be set for the horizontal hydraulic conductivity, and vertical and horizontal anisotropy using the MODFLOW array editor in GMS.
Additional options are also included here. It is possible to remove vertical leakance correction or set a head value for dry cells. These options are in their own dialog accessible through the main UPW package dialog.
It should be noted that the UPW flow package is only available for use in the MODFLOW-NWT model and is not available with other versions of MODFLOW. The UPW is designed to work with the NWT linearization approach which generates an asymmetric matrix.
If you have a MODFLOW-NWT groundwater model that needs a different approach to calculating conductance, try out the UPW package in GMS today!