WMS

Curve Number Values for NLCD Land Use Data

Are you wondering what values to use for composite curve numbers used with NLCD land use data in your WMS project? WMS contains a Compute GIS Attributes calculator in the Hydrologic Modeling Module that allows you to import composite curve numbers to use in land use mapping. This can allow you to define boundaries for different soils, rainfall depths, etc. This post will cover some different resources to get the values you need.

Compute GIS Attributes with Imported Curve Data

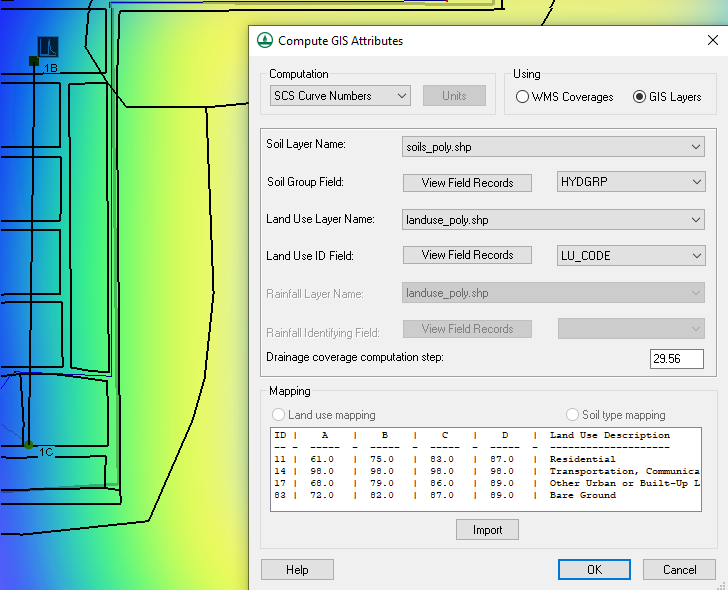
It is important to be aware that there are two options when using the Computing GIS Attributes calculator: WMS Coverages as well as GIS Layers. With both GIS Layers and WMS Coverages you are given the option of selecting the Soil Layer Name, Drainage coverage computation step, etc. In the GIS Layers you are given the option to view field records and assign a code of your choosing. To use the GIS Layers option, you will need to have already imported GIS data into your project. In order to make the WMS Coverages option active you will need to have created your own land use or soil type coverages within WMS. Using the WMS Coverage option allows you to import your own land use or soil curve numbers from a text file.

What values you use for the text file depends on your own judgment and what would work best for your project. One option to get the table values is to use the example files found on XMS Wiki in the SCS Curve Numbers section. Opening one of these examples will show you an area-weighted average of the different curve numbers for the different regions. Another option is to visit the USGS website, download the example data, and import it into the GIS Attributes dialog. Finally, you can make your own table In which case use your engineering judgment to determine the CN values for your project.

Try out inserting curve number values for NLCD land use data in WMS today!

Blog tags: 

Tips for Working with Virtual Machines

Have you installed GMS, SMS, or WMS (collectively referred to as XMS) on a virtual machine in your office? Using a virtual machine is often done in order to run multiple operating systems, consolidate computing resources, provide integrated disaster recovery, or a number of other reasons. XMS software can be installed on a virtual machine in order to fit your needs. Here are some tips for working with XMS when using a virtual machine.

Virutal machine

First, make certain that your XMS license is compatible with a virtual machine. Both local and flex license codes can be used with a virtual machine. However, local codes will not allow the software to be used by other machines. Older single-user locks cannot be used with a virtual machine.

When using a flex license, the virtual machine will need to have access to the local network in order for other machines to access the XMS license and use the software. Both the XMS application and the Aquaveo License manager need to be installed on the virtual machine.

When sharing files between a virtual machine and a host machine, pay attention to where XMS is running. XMS requires that all files be placed where XMS is installed. Therefore, you cannot save your project on the host machine and run them from the virtual machine if XMS is installed on the virtual machine. You will need to move the files to the virtual machine where XMS and XMS license is installed.

It should also be noted that some simulation runs and application processes in XMS will run slower on a virtual machine than running the same process directly on a physical machine. This is due to the nature of using a virtual machine. If there is a process that is taking an unusually long time, it is recommended that you try running the application on a physical machine.

If you are experiencing issues running XMS on a virtual machine, contact our technical support team and they will be happy to assist you.

Blog tags: 

Registering an Image in XMS

Do you have an image that you would like to add to your project, but that image doesn’t have any coordinate information? Many projects require that you have an image or map that defines the proposed location for structures, wells, or other objects. In XMS (GMS, SMS, and WMS) the image needs to have coordinate information in order to correctly align with the project data. If your image does not have coordinate information, the Register Image dialog will appear.

Example of the Register Image dialog

To use the Register Image dialog, designate three points on the image and enter the coordinate information for those points. XMS will then use those coordinates to create the coordinate data for the entire image. It is possible to register an image using only two points, but three points is recommended.

If you do not know the coordinate information for any points on the image, here is a tip for getting coordinate information for the image.

  1. Click the Add Online Maps macro to open the Virtual Earth Map Locator dialog.
  2. Search for the area of your image by putting the name into the search bar and click Jump to Search Location.
  3. Be sure that the entire project bounds are within the window and match the area of your unregistered image.
  4. Download the new image and set the projection for this image.
  5. Note: you could just use this new image, but if the image you are trying to import shows the location of proposed structures, boreholes, etc., then you may need to still import the unregistered image.
  6. Outside of XMS, use a photo viewer to open the unregistered image.
  7. Compare both images and find three places where you can easily tell that the images match up.
  8. Now, in XMS, place your mouse over one of the three locations that you will need the geographical coordinates for.
  9. At the bottom of XMS you can view the coordinate information. Write down the coordinate information, then repeat in two other places.
  10. Now that you have all of the location coordinates you need to register the image, open the unregistered image file in XMS to bring up the Register Image dialog.
  11. Click the three points you have coordinate information for and enter in the coordinates that you wrote down earlier.
  12. After registering the image, check the alignment of the images if needed.
  13. Try registering an image for your project in SMS, GMS, or WMS today!

Blog tags: 

Tips for Watershed Delineation

Having a well delineated watershed basin can make a difference in your watershed model. WMS contains a method to automatically delineate a watershed for your projects. This tool can quickly create a delineated basin so you can move on with your watershed projects. This post will cover the different tips on how to help you successfully delineate a watershed basin in WMS.

Try switching between TOPAZ and TauDEM
Example of the Watershed Delineation Wizard in WMS

If using either TOPAZ or TauDEM fails to give you a valid watershed basin, try using the other. Switching between TOPAZ and TauDEM can help with delineating your watershed, however, it does depend on what you need for preprocessing. It is important to remember that TauDem can only work for pulling out streams, it does not work for ridges. This is why in most cases it is better to use TOPAZ. These tools both can take a while to run so it is best to get this process done as soon as possible.

Check the resolution of your DEM

If the resolution is too low on your DEM then it is unlikely that it will properly generate the data files. You can fix this by choosing a DEM that has a higher resolution. However, it is important to note that if the resolution is too high it may take too long for the data files to load and for the delineation process to finish. It is best to find a happy medium between the two so the data files will load, the delineation will go quickly, and the resolution will still hold up.

Adjust your outlet location

In order to delineate a watershed, you will need a place for all the water to end up flowing to. A misplaced outlet point can cause issues with the delineation process. Adjusting the location of the outlet point can improve the final basin results.

Try out delineating watershed basins on your project in WMS 11.1 today!

Blog tags: 

Pages