WMS

Using the Time Series Editor

Do you have an older text file that is in a format that isn’t quite right for your project? Reformatting an older file can be time consuming. Using a time series editor or similar tool can make reformatting the text easier. Provided with WMS is the Time Series Data Editor application.

Using the Time Series Data Editor allows you to reformat files that are not correctly formatted. To do this, the application provides a number of tools. First off, the application can be used for both time series data and XY series data. Once the time series or XY series data file has been imported into the Time Series Data Editor, the application allows you to adjust how the text file is formatted.

For example, perhaps the text file has been formatted using a time stamp where the date is written without a space between the day, month, and year making all three a single column. The Time Series Data Editor allows you to separate out this date format into separate columns

When importing the files into the Time Series Data Editor application, you can select to import using a fixed width or using a delimiter such as a tab or space.

Once you've imported your data, the Time Series Data Editor will display a graph of the data. From here, if necessary, you can make adjustments to individual points in the data.

Time Series Data Editor example

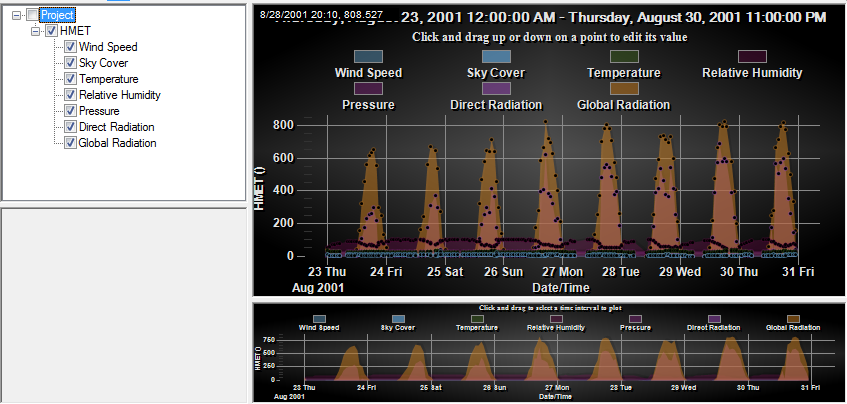
The Time Series Data Editor also allows you to generate either time series or XY series data from scratch.

After you are satisfied with how the data appears, the Time Series Data Editor allows you to export the data into a number of different formats.

While the Time Series Data Editor is packaged with WMS, it can also prove useful for data that needs to be formatted for GMS, SMS, or other applications. Download the Time Series Data Editor with WMS today!

Blog tags: 

Changes to Aquaveo Registration

Aquaveo has been updating its registration process to make using our products easier and more secure. The change affects newer versions of our products, specifically GMS 10.5, SMS 13.1, and AHGW 3.5. Going forward, it will be added to all of our products, including WMS.

The new registration uses new codes: Local and Flex codes.

  • Local password: will support virtual machines and remote desktop, but is only good for one machine and cannot be moved from one computer to another.
  • Flex password: acts like a network lock where the license is hosted on your computer and can be used over remote desktop or on a virtual machine. When you want to move the license to another computer, you simply check the license back in and check it out on another machine. There is no hardware to deal with.

By default the software is set to use the newer registration process with newer versions of the software. Local and Flex codes are not compatible with older versions of our software.

In many cases you won't notice a difference with the change to licensing. However, if you encounter an error with your registration or want to use the older licensing process, you can switch back to using the old registration.

  1. Open the newly installed software.
  2. Choose to run it in Community Edition, if the "no license found" dialog appears.
  3. Once the software is open, go to Edit | Preferences.
  4. Click on the Licensing tab.
  5. Check on the box for "Use Legacy Licensing".
  6. Click OK and restart the software.
  7. Then register the software as you have before.
Switching to legacy registration

Currently, we plan on supporting hardware locks and the legacy registration version for at least the next two years. If you want to try out the new registration system, contact our licensing team at licensing@aquaveo.com.

Blog tags: 

Using Shapefiles for Stream Arcs in WMS

Shapefiles contain valuable data that can be used for modeling in WMS. If you have an existing shapefile that has arcs that define the streams for the area you will be modeling, you can use that shapefile to define the streams in your WMS project. Doing this can save you from manually having to define the stream arcs manually.

Do use a shapefile for stream arcs in WMS, do the following:

  1. Import or download the shapefile into WMS. The file data will appear in the GIS module. Review the arcs to make certain they align with the stream location.
  2. With the shapefile active, use the Mapping | Shapes to Feature Objects command.
  3. In the GIS to Feature Objects Wizard, map the shapefile to the drainage coverage. If you are using another coverage besides the drain coverage make certain to select the correct coverage in the first step of the wizard.
  4. After mapping the arcs to the drainage coverage, use the Select Feature Arc tool to select arcs along each stream.
  5. Right-click and select the Attributes command to open the Attributes dialog for the selected arcs.
  6. Change the attributes of the arcs to be Streams.
Converting the arcs to stream arcs

After creating the stream arcs, it is recommended that you review the streams to make certain the streams going in the right direction. Use the display option to see the stream arc direction and use the Reverse Direction command to change the direction of arcs.

It is also recommended that you carefully review the arcs that were mapped over to the drainage coverage. Delete any unnecessary arcs and clean up the arcs to improve the performance of the model. It is recommended that stream arcs be merged together except in locations where they branch or where a subbasin is meant to start. Merge arcs by changing a node to a vertex.

Shapefiles can help you build your watershed project in WMS quickly Try out creating stream arcs from shapefiles in WMS today!

Blog tags: 

Using Evaluation Versions of GMS, SMS, and WMS

Are you wanting to try out GMS, SMS, or WMS, but aren’t quite ready to commit to purchasing a license? Or maybe you have a license, but your maintenance has lapsed and you’d like to check out the new features in a beta version before updating your maintenance?

Aquaveo permits using an evaluation license for its products to permit you to try out our software to see if it will meet your needs. Evaluation licenses are temporary license codes that let you use all the functionality of our software for two weeks.

To receive an evaluation license code, do the following:

Use the evaluation code to register
  1. Download the software you want to evaluate from our downloads page.
  2. After downloading and installing the software, use the Request License button in the Registration Wizard to go to the Software Evaluation Request page on our website.
  3. Fill out the request form and an evaluation license code will be sent to you.
  4. Register the software using the evaluation license code sent to you.

After registering the software with the evaluation code you will be able to use all of the software functionality to determine if the software will meet your water modeling needs. Note that evaluation licenses are only for evaluation purposes and are not intended for creating finished models. It should also be noted that certain third party models, such as TUFLOW or Hydro AS-2D, will still require a separate license in order to fully evaluate them.

After the two week trial period, the license will expire and you will no longer be able to use the software until a paid license code is entered. You are only permitted one evaluation license per product per version.

If you encounter problems with registering an evaluation license, contact our support team at support@aquaveo.com. If you started an evaluation license and were unable to use the license during the evaluation period, contact our licensing team at licensing@aquaveo.com.

Blog tags: 

Pages